UVVisIR: Difference between revisions
No edit summary |
|||
| (15 intermediate revisions by the same user not shown) | |||
| Line 1: | Line 1: | ||
== Description == |
== Description == |
||
[[File:UVVisIR.png|alt=UVVisIR connected to UVVisIRDIN device|thumb|UVVisIR connected to UVVisIRDIN device]] |
|||
UVVisIR is a software designed to use with UVVisIRDIN, |
UVVisIR is a software designed to use with UVVisIRDIN, UVVisIRUSB, UVVisIRControl, and UVVisIRLCD devices. It is used to configure device language, alarming (visual and audio signals), relay regulation and to perform measurements. On the main window is presented the current sensing values for UV, Vis and IR spectrums and the device current configuration. |
||
For backup purpouse, You can save the configuration to a cfg file, and load it into other device, or to change the stored configuration without connected device. |
For backup purpouse, You can save the configuration to a cfg file, and load it into other device, or to change the stored configuration without connected device. |
||
The UVVisIR software can also make a measurement. You can configure where to store the CSV (Comma Separated Values) file, with the |
The UVVisIR software can also make a measurement. You can configure where to store the CSV (Comma Separated Values) file, with the measured value, and the measurement duration, in seconds. |
||
== Supported devices == |
|||
With UVVisIR software You can use four devices: |
|||
* UVVisIRDIN |
|||
* UVVisIRControl |
|||
* UVVisIRLCD |
|||
* UVVisIRUSB |
|||
== Installation and setup == |
|||
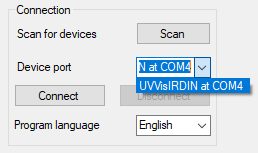
You can download the program from the software repository. UVVisIR is a freeware software, that can be installed on Windows 10 and 11. After the installation, You can start it from the Start Menu. At the left-right corner is the Connection part of the program. With a scan button, You can search for connected devices. Program language can be set from the same part. It supports 18 languages: English, German, French, Italian, Portuguese, Spanish, Dutch, Hungarian, Croatian, Slovenian, Serbian, Czech, Slovak, Polish, Danish, Swedish, Norwegian, and Finnish. After You have chosen the correct language, restart the program to take effect. |
|||
== Configuration == |
|||
[[File:UVVisIR with connected UVVisIRDIN device on COM4.png|alt=UVVisIR with connected UVVisIRDIN device on COM4|thumb|UVVisIR with connected UVVisIRDIN device on COM4]] |
|||
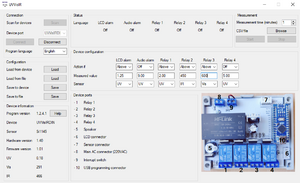
Loading the configuration can be done from a connected device or the file. An example of configuration files can be downloaded here. By connecting to the device, the current configuration of the device will be automatically loaded. If the device supports actions, like relays of alarms, or languages, it can be set up by Device configuration. |
|||
The actions can be set to Off, Above, and Below the value of the sensor. Triggering value is defined under the action part for the same control. |
|||
Example of a configuration for Relay 1 - Action Below, value 300, Sensor Vis. |
|||
In this case, the Relay 1 will be activated if the lightning intensity of Visible light (Vis) is under 300 value, for example, to turn on the floor lighting in garden at evening. |
|||
Example of a configuration for Relay 2 - Action Above, value 4, Sensor UV. |
|||
In this case, the Relay 2 will be activated if is the Ultra Violet Index higher that 4. Can be used to warn peoples on beach to use sun protection creams, or to find shadow for kids. |
|||
Example of a configuration for Relay 3 - Action Above, value 600, Sensor IR. |
|||
In this case, the Relay 3 will be activated if the Infra Red radiation is over 600 value. Can be used to start a cooler or a warning system to prevent fire. |
|||
Device language can be changed by drop-down menu. UVVisIRControl support the same 18 languages as the program: English, German, French, Italian, Portuguese, Spanish, Dutch, Hungarian, Croatian, Slovenian, Serbian, Czech, Slovak, Polish, Danish, Swedish, Norwegian and Finnish After You changed the language, You must save the configuration to the device. |
|||
[[File:UVVisIR configuration of UVVisIRDIN device.png|alt=UVVisIR configuration of UVVisIRDIN device|center|thumb|738x738px|UVVisIR configuration of UVVisIRDIN device]] |
|||
=== Saving the configuration === |
|||
After You made the configuration, You can save the setup to the connected device, or file. Saving to the device will take an immediate change of the configuration, is no need to restart the device after the new configuration is uploaded. By saving the setup to a file, You can always load it into a new device or examine it later. Saved configurations are stored as .cfg files. |
|||
If You made an incorrect setup, the program will warn You about it and will not write the miss-configured parameters into the device or to the file. |
|||
== Device information and status == |
|||
[[File:UVVisIRDIN information.png|alt=UVVisIRDIN information|thumb|UVVisIRDIN information]] |
|||
If the device is connected, in the left bottom corner is presented the Device information. |
|||
* Program version |
|||
* Device - the name of the connected device |
|||
* Sensor - the type of the sensor |
|||
* Hardware version - the version of the PCB and the case |
|||
* Firmware version - main software of the device |
|||
* Object - measured temperature of the object |
|||
* Air - measured temperature of the air |
|||
On the top middle of the window can You see the Status |
|||
It shows the current language and the status of alarms and relays. These statuses are updated once a second. |
|||
[[File:UVVisIRDIN Alarms and Relays statuses.png|alt=UVVisIRDIN Alarms and Relays statuses|center|thumb|528x528px|UVVisIRDIN Alarms and Relays statuses]] |
|||
In the lower part of the window can You see the Device ports and the photo of the device ports. Depending on the device, it can show You the power connection, the switching port, connectors for the sensor, relays, etc. On the right bottom side is the photo of the connecting side and the position of the ports, so You can easily find the ports. |
|||
[[File:UVVisIRDIN Connectors and ports.png|alt=UVVisIRDIN Connectors and ports|center|thumb|695x695px|UVVisIRDIN Connectors and ports]] |
|||
== Measurement == |
|||
[[File:Laserdistance measurement.webp|alt=UVVisIR measurement settingns|thumb|UVVisIR measurement settingns]] |
|||
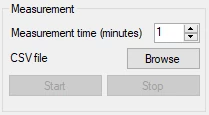
Measurements can be programmed in the right top corner. Before You can begin with measurement, You must choose how long will be measured. This can be defined with the Measurement time (minutes), minimal time is 1 minute. After You defined the duration, You must choose the file name, where they will be stored measured data. It will have a .csv extension. |
|||
The file is a textual file and can be edited with Notepad or any other text editor. The measured values are presented in the format: |
|||
<code>time , UV , Vis , IR</code> |
|||
An example of measurement: |
|||
<code>598 , 2.69 , 625 , 811</code> |
|||
That means that in 598. second of the measurement was the UV Index at 2.69, the intensity of the Visual Spectrum was 625 and the Infra Red intensity was 811. With these values, You can generate graphics or other scientific data analyzes. |
|||
Latest revision as of 15:45, 7 May 2023
Description
UVVisIR is a software designed to use with UVVisIRDIN, UVVisIRUSB, UVVisIRControl, and UVVisIRLCD devices. It is used to configure device language, alarming (visual and audio signals), relay regulation and to perform measurements. On the main window is presented the current sensing values for UV, Vis and IR spectrums and the device current configuration.
For backup purpouse, You can save the configuration to a cfg file, and load it into other device, or to change the stored configuration without connected device.
The UVVisIR software can also make a measurement. You can configure where to store the CSV (Comma Separated Values) file, with the measured value, and the measurement duration, in seconds.
Supported devices
With UVVisIR software You can use four devices:
- UVVisIRDIN
- UVVisIRControl
- UVVisIRLCD
- UVVisIRUSB
Installation and setup
You can download the program from the software repository. UVVisIR is a freeware software, that can be installed on Windows 10 and 11. After the installation, You can start it from the Start Menu. At the left-right corner is the Connection part of the program. With a scan button, You can search for connected devices. Program language can be set from the same part. It supports 18 languages: English, German, French, Italian, Portuguese, Spanish, Dutch, Hungarian, Croatian, Slovenian, Serbian, Czech, Slovak, Polish, Danish, Swedish, Norwegian, and Finnish. After You have chosen the correct language, restart the program to take effect.
Configuration
Loading the configuration can be done from a connected device or the file. An example of configuration files can be downloaded here. By connecting to the device, the current configuration of the device will be automatically loaded. If the device supports actions, like relays of alarms, or languages, it can be set up by Device configuration.
The actions can be set to Off, Above, and Below the value of the sensor. Triggering value is defined under the action part for the same control.
Example of a configuration for Relay 1 - Action Below, value 300, Sensor Vis.
In this case, the Relay 1 will be activated if the lightning intensity of Visible light (Vis) is under 300 value, for example, to turn on the floor lighting in garden at evening.
Example of a configuration for Relay 2 - Action Above, value 4, Sensor UV.
In this case, the Relay 2 will be activated if is the Ultra Violet Index higher that 4. Can be used to warn peoples on beach to use sun protection creams, or to find shadow for kids.
Example of a configuration for Relay 3 - Action Above, value 600, Sensor IR.
In this case, the Relay 3 will be activated if the Infra Red radiation is over 600 value. Can be used to start a cooler or a warning system to prevent fire.
Device language can be changed by drop-down menu. UVVisIRControl support the same 18 languages as the program: English, German, French, Italian, Portuguese, Spanish, Dutch, Hungarian, Croatian, Slovenian, Serbian, Czech, Slovak, Polish, Danish, Swedish, Norwegian and Finnish After You changed the language, You must save the configuration to the device.
Saving the configuration
After You made the configuration, You can save the setup to the connected device, or file. Saving to the device will take an immediate change of the configuration, is no need to restart the device after the new configuration is uploaded. By saving the setup to a file, You can always load it into a new device or examine it later. Saved configurations are stored as .cfg files.
If You made an incorrect setup, the program will warn You about it and will not write the miss-configured parameters into the device or to the file.
Device information and status
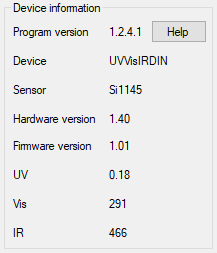
If the device is connected, in the left bottom corner is presented the Device information.
- Program version
- Device - the name of the connected device
- Sensor - the type of the sensor
- Hardware version - the version of the PCB and the case
- Firmware version - main software of the device
- Object - measured temperature of the object
- Air - measured temperature of the air
On the top middle of the window can You see the Status
It shows the current language and the status of alarms and relays. These statuses are updated once a second.
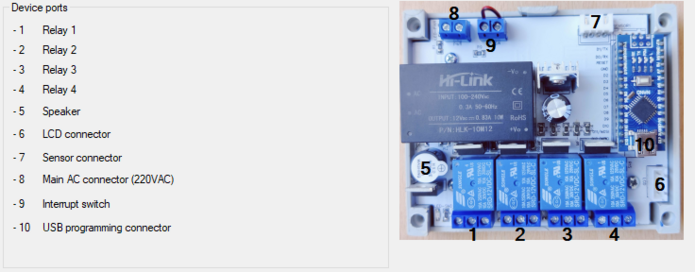
In the lower part of the window can You see the Device ports and the photo of the device ports. Depending on the device, it can show You the power connection, the switching port, connectors for the sensor, relays, etc. On the right bottom side is the photo of the connecting side and the position of the ports, so You can easily find the ports.
Measurement
Measurements can be programmed in the right top corner. Before You can begin with measurement, You must choose how long will be measured. This can be defined with the Measurement time (minutes), minimal time is 1 minute. After You defined the duration, You must choose the file name, where they will be stored measured data. It will have a .csv extension.
The file is a textual file and can be edited with Notepad or any other text editor. The measured values are presented in the format:
time , UV , Vis , IR
An example of measurement:
598 , 2.69 , 625 , 811
That means that in 598. second of the measurement was the UV Index at 2.69, the intensity of the Visual Spectrum was 625 and the Infra Red intensity was 811. With these values, You can generate graphics or other scientific data analyzes.
